Tutorial
Prerequisites
Install docker, verify its installation by running
$ docker --version
Docker version 18.06.1-ce, build e68fc7a
Install docker-compose > 1.19.0, verify its installation by running
$ docker-compose --version
docker-compose version 1.22.0, build f46880fe
User must be a part of the
dockergroup (be able to rundockercommands withoutsudo). Details on how to achieve that can be found in the official docs.(Optional) Install virtualenv and create one to work on.
Note
virtualenv understand that the deployment will not be using this env - it will only be used to install denzel on it.Installation
$ pip install denzel
denzel Command Line Interface (CLI) available.denzel --help for the help menu.Toy Model
import pandas as pd
from sklearn.svm import SVC
from sklearn.model_selection import train_test_split
import pickle

# -------- Load data --------
IRIS_DATA_URL = "https://archive.ics.uci.edu/ml/machine-learning-databases/iris/iris.data"
IRIS_DATA_COLUMNS = ['sepal-length', 'sepal-width', 'petal-length', 'petal-width', 'class']

iris_df = pd.read_csv(IRIS_DATA_URL,
                      names=IRIS_DATA_COLUMNS)


# -------- Spit train and test --------
features, labels = iris_df.values[:, 0:4], iris_df.values[:, 4]

test_fraction = 0.2
train_features, test_features, train_labels, test_labels = train_test_split(
    features, labels,
    test_size=test_fraction)

# -------- Train and evaluate --------
model = SVC()
model.fit(X=train_features, y=train_labels)

print(model.score(X=test_features, y=test_labels))
>> 0.9666666666666667

# -------- Save for later --------
SAVED_MODEL_PATH = '/home/creasy/saved_models/iris_svc.pkl'
with open(SAVED_MODEL_PATH, 'wb') as saved_file:
    pickle.dump(
        obj=model,
        file=saved_file)
Starting a denzel Project
Note
--gpu flag.$ denzel startproject iris_classifier
Successfully built iris_classifier project skeleton
$ cd iris_classifier
$ tree
.
|-- Dockerfile
|-- __init__.py
|-- app
| |-- __init__.py
| |-- assets
| | `-- info.txt <-------------------------- Deployment information
| |-- logic
| | |-- __init__.py
| | `-- pipeline.py <----------------------- Pipeline Methods
| `-- tasks.py
|-- docker-compose.yml
|-- entrypoints
| |-- api.sh
| |-- denzel.sh
| `-- monitor.sh
|-- logs
`-- requirements.txt <-------------------------- Requirements
requirements.txt - Here we’ll store all the pip packages our system needsapp/assets/info.txt - Text file that contains deployment information about our model and systemapp/logic/pipeline.py - Here we will edit the body of the Pipeline MethodsTip
pipeline.py and if you wish to add your own custom functions that will be called from within pipeline.py, you should put them on a separate file inside the app/logic directory and import them.Requirements
scikit-learn so before anything we want to specify this requirement in the requirements.txt file.scikit-learn, numpy and scipy as requirements - don’t forget to leave a blank line in the end.requirements.txt should look like this# ---------------------------------------------------------------
# USER GUIDE
# Remember this has to be a lightweight service;
# Keep that in mind when choosing which libraries to use.
# ---------------------------------------------------------------
scikit-learn
numpy
scipy
Define Interface (API)
{
    "callback_uri": <callback_uri>,
    "data": {<unique_id1>: {"sepal-length": <float>,
                            "sepal-width": <float>,
                            "petal-length": <float>,
                            "petal-width": <float>},
             <unique_id2>: {"sepal-length": <float>,
                            "sepal-width": <float>,
                            "petal-length": <float>,
                            "petal-width": <float>},
             ...}
}
app/assets/info.txt file that will be available to the end user in the /info endpoint.info.txt to something like this
# =====================  DEPLOYMENT  ======================

    ██████╗ ███████╗███╗   ██╗███████╗███████╗██╗
    ██╔══██╗██╔════╝████╗  ██║╚══███╔╝██╔════╝██║
    ██║  ██║█████╗  ██╔██╗ ██║  ███╔╝ █████╗  ██║
    ██║  ██║██╔══╝  ██║╚██╗██║ ███╔╝  ██╔══╝  ██║
    ██████╔╝███████╗██║ ╚████║███████╗███████╗███████╗
    ╚═════╝ ╚══════╝╚═╝  ╚═══╝╚══════╝╚══════╝╚══════╝
                         v0.1.5

# ========================  MODEL  ========================

Model information:
    Version: 1.0.0
    Description: Iris classifier

For prediction, make a POST request for /predict matching the following scheme

{
    "callback_uri": "http://alonzo.trainingday.com/stash",
    "data": {<unique_id1>: {"sepal-length": <float>,
                            "sepal-width": <float>,
                            "petal-length": <float>,
                            "petal-width": <float>},
             <unique_id2>: {"sepal-length": <float>,
                            "sepal-width": <float>,
                            "petal-length": <float>,
                            "petal-width": <float>},
             ...}
}
Launch (partial project)
info.txt and requirements.txt files and we can launch our API, without the functionality of the /predict endpoint (yet).$ denzel launch
Creating network "iris_classifier_default" with the default driver
Pulling redis (redis:4)...
4: Pulling from library/redis
802b00ed6f79: Pull complete
8b4a21f633de: Pull complete
92e244f8ff14: Pull complete
fbf4770cd9d6: Pull complete
.
.
Note
By default denzel will occupy port 8000 for the API and port 5555 for monitoring. If one of them is taken, denzel will let you know and you can opt for other ports - for more info check the launch command documentation.
Starting redis   ... done
Starting api     ... done
Starting denzel  ... done
Starting monitor ... done
requirements.txt, you can view the status of the services by using the status command, optionally with the --live flag.$ denzel status
Services:
denzel - PIP INSTALLING...
monitor - PIP INSTALLING...
api - PIP INSTALLING...
redis - UP
UP with an additional line Worker: worker@iris_classifier - UP indicating the worker is ready.requirements.txt file and use the updatereqs command.Tip
denzel status --live command is a great way to monitor the system. When conducting installations and loading it is a great way to get a high level live view of the system.denzel logs --live.info.txt (assuming all services are up).Pipeline Methods
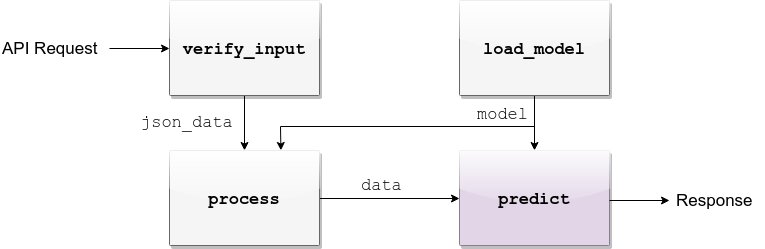
app/logic/pipeline.py.verify_input

FEATURES = ['sepal-length', 'sepal-width', 'petal-length', 'petal-width']

def verify_input(json_data):
    """
    Verifies the validity of an API request content

    :param json_data: Parsed JSON accepted from API call
    :type json_data: dict
    :return: Data for the the process function
    """

    # callback_uri is needed to sent the responses to
    if 'callback_uri' not in json_data:
        raise ValueError('callback_uri not supplied')

    # Verify data was sent
    if 'data' not in json_data:
        raise ValueError('no data to predict for!')

    # Verify data structure
    if not isinstance(json_data['data'], dict):
        raise ValueError('jsondata["data"] must be a mapping between unique id and features')

    # Verify data scheme
    for unique_id, features in json_data['data'].items():
        feature_names = features.keys()
        feature_values = features.values()

        # Verify all features needed were sent
        if not all([feature in feature_names for feature in FEATURES]):
            raise ValueError('For each example all of the features [{}] must be present'.format(FEATURES))

        # Verify all features that were sent are floats
        if not all([isinstance(value, float) for value in feature_values]):
            raise ValueError('All feature values must be floats')

    return json_data
Exception and the message attached to it will be sent back to the user in case he tackles that exception.Tip
For JSON scheme verification, you can consider using the jsonschema library.
load_model

app/assets. Once copied there, the assets directory should be as follows:$ cd app/assets/
$ ls -l
total 8
-rw-rw-r-- 1 creasy creasy 1623 Sep 14 14:35 info.txt
-rw-rw-r-- 1 creasy creasy 3552 Sep 14 08:55 iris_svc.pkl
app/logic/pipeline.py we will find the skeleton of load_model.import pickle
.
.
def load_model():
"""
Load model and its assets to memory
:return: Model, will be used by the predict and process functions
"""
with open('./app/assets/iris_svc.pkl', 'rb') as model_file:
loaded_model = pickle.load(model_file)
return loaded_model
Note
requirements.txt is stored). Hence the saved model prefix above is ./app/assets/....denzel restart and after the services have restarted the changes will take effect.Warning
--live flag. If your model is indeed taking much time to load, the output should like like follows:$ denzel status
Services:
denzel - UP
monitor - UP
api - UP
redis - UP
Worker: all - LOADING...
process

.
.
import numpy as np
.
.

def process(model, json_data):
    """
    Process the json_data passed from verify_input to model ready data

    :param model: Loaded object from load_model function
    :param json_data: Data from the verify_input function
    :return: Model ready data
    """

    # Gather unique IDs
    ids = json_data['data'].keys()

    # Gather feature values and make sure they are in the right order
    data = []
    for features in json_data['data'].values():
        data.append([features[FEATURES[0]], features[FEATURES[1]], features[FEATURES[2]], features[FEATURES[3]]])

    data = np.array(data)
    """
    data = [[float, float, float, float],
            [float, float, float, float]]
    """

    return ids, data
predict
def predict(model, data):
    """
    Predicts and prepares the answer for the API-caller

    :param model: Loaded object from load_model function
    :param data: Data from process function
    :return: Response to API-caller
    :rtype: dict
    """

    # Unpack the outputs of process function
    ids, data = data

    # Predict
    predictions = model.predict(data)

    # Pack the IDs supplied by the end user and their corresponding predictions in a dictionary
    response = dict(zip(ids, predictions))

    return response
Warning
The returned value of the predict function must be a dictionary and all of its contents must be JSON serializable. This is necessary because denzel will parse it into JSON to be sent back to the end user.
denzel restart so they will take effect.pipeline.py file should look like thisimport pickle
import numpy as np
FEATURES = ['sepal-length', 'sepal-width', 'petal-length', 'petal-width']
# -------- Handled by api container --------
def verify_input(json_data):
"""
Verifies the validity of an API request content
:param json_data: Parsed JSON accepted from API call
:type json_data: dict
:return: Data for the the process function
"""
# callback_uri is needed to sent the responses to
if 'callback_uri' not in json_data:
raise ValueError('callback_uri not supplied')
# Verify data was sent
if 'data' not in json_data:
raise ValueError('no data to predict for!')
# Verify data structure
if not isinstance(json_data['data'], dict):
raise ValueError('jsondata["data"] must be a mapping between unique id and features')
# Verify data scheme
for unique_id, features in json_data['data'].items():
feature_names = features.keys()
feature_values = features.values()
# Verify all features needed were sent
if not all([feature in feature_names for feature in FEATURES]):
raise ValueError('For each example all of the features [{}] must be present'.format(FEATURES))
# Verify all features that were sent are floats
if not all([isinstance(value, float) for value in feature_values]):
raise ValueError('All feature values must be floats')
return json_data
# -------- Handled by denzel container --------
def load_model():
"""
Load model and its assets to memory
:return: Model, will be used by the predict and process functions
"""
with open('./app/assets/iris_svc.pkl', 'rb') as model_file:
loaded_model = pickle.load(model_file)
return loaded_model
def process(model, json_data):
"""
Process the json_data passed from verify_input to model ready data
:param model: Loaded object from load_model function
:param json_data: Data from the verify_input function
:return: Model ready data
"""
# Gather unique IDs
ids = json_data['data'].keys()
# Gather feature values and make sure they are in the right order
data = []
for features in json_data['data'].values():
data.append([features[FEATURES[0]], features[FEATURES[1]], features[FEATURES[2]], features[FEATURES[3]]])
data = np.array(data)
return ids, data
def predict(model, data):
"""
Predicts and prepares the answer for the API-caller
:param model: Loaded object from load_model function
:param data: Data from process function
:return: Response to API-caller
:rtype: dict
"""
# Unpack the outputs of process function
ids, data = data
# Predict
predictions = model.predict(data)
# Pack the IDs supplied by the end user and their corresponding predictions in a dictionary
response = dict(zip(ids, predictions))
return response
Using the API to Predict
john_q and press “Subscribe”.Tip
$ curl --header "Content-Type: application/json" \
> --request POST \
> --data '{"callback_uri": "http://waithook.com/john_q",'\
> '"data": {"a123": {"sepal-length": 4.6, "sepal-width": 3.6, "petal-length": 1.0, "petal-width": 0.2},'\
> '"b456": {"sepal-length": 6.5, "sepal-width": 3.2, "petal-length": 5.1, "petal-width": 2.0}}}' \
http://localhost:8000/predict
import requests

data = {
  "callback_uri": "http://waithook.com/john_q",
  "data": {"a123": {"sepal-length": 4.6, "sepal-width": 3.6, "petal-length": 1.0, "petal-width": 0.2},
           "b456": {"sepal-length": 6.5, "sepal-width": 3.2, "petal-length": 5.1, "petal-width": 2.0}}
}

response = requests.post('http://localhost:8000/predict', json=data)
requests you’ll have it in response.json()):{"status":"success","data":{"task_id":"19e39afe-0729-43a8-b4c5-6a60281157bc"}}
{
  "method": "POST",
  "url": "/john_q",
  "headers": {
    "User-Agent": "python-requests/2.19.1",
    "Connection": "close",
    "X-Forwarded-Proto": "http",
    "Accept": "*/*",
    "Accept-Encoding": "gzip, deflate",
    "Content-Length": "49",
    "Content-Type": "application/json",
    "Host": "waithook.com",
    "X-Forwarded-for": "89.139.202.80"
  },
  "body": "{\"a123\": \"Iris-setosa\", \"b456\": \"Iris-virginica\"}"
}
"body" section, you can see the returned predictions.Monitoring

Example of Flower’s monitoring UI
Debugging
verify_input Exceptions
/predict POST request.verify_input we should get the following response{
"title": "Bad input format",
"description": "For each example all of the features [['sepal-length', 'sepal-width', 'petal-length', 'petal-width']] must be present"
}
load_model Exceptions
--service denzel option) or logworker command.process & predict Exceptions
"SUCCESS" status to your response with a task ID.numpy as np even though it is in use in the process method - we will get a "SUCCESS" response for our POST (because we passed the verify_input method).{
"status": "FAILURE",
"result": {"args":["name 'np' is not defined"]}
}
Deployment
$ denzel shutdown --purge

Stopping iris_classifier_denzel_1  ... done
Stopping iris_classifier_monitor_1 ... done
Stopping iris_classifier_api_1     ... done
Stopping iris_classifier_redis_1   ... done
Removing iris_classifier_denzel_1  ... done
Removing iris_classifier_monitor_1 ... done
Removing iris_classifier_api_1     ... done
Removing iris_classifier_redis_1   ... done
Removing network iris_classifier_default
Removing image redis:4
Removing image denzel:1.0.0
Removing image denzel:1.0.0
ERROR: Failed to remove image for service denzel:1.0.0: 404 Client Error: Not Found ("No such image: denzel:1.0.0")
Removing image denzel
ERROR: Failed to remove image for service denzel:1.0.0: 404 Client Error: Not Found ("No such image: denzel:1.0.0")

$ denzel launch
Creating network "iris_classifier_default" with the default driver
Pulling redis (redis:4)...
4: Pulling from library/redis
.
.
Note
--purge flag that tells denzel to remove the denzel image.denzel launch from within that directory.Production
docker-compose.yml, the Dockerfile and all the code needed to run and manage the application - Any service or person that can deal with docker will be able to do so.