Introduction
Denzel was designed by data scientists for data scientists.
The framework utilizes production grade tools and practices to allow quick deployment, while abstracting all the mechanics behind the scenes.
To launch a service with API interface, task queue management and monitoring the only thing required from the data scientist is to fill four functions, and denzel will take care of the rest.
Those four functions are
pipeline.load_model(), pipeline.verify_input(), pipeline.process() and pipeline.predict() (also called Pipeline Methods).Motivation
Data scientists are not necessarily software engineers. In most companies’ structure the data science team is separated from the other engineering teams.
In a standard workflow the data science team will get some data and a problem to solve. The team will then iterate until the point where they believe their solution is worthy and will want to test it out in production environment.
Once this point is reached it is not guaranteed that the engineering teams will have the availability to wrap the solution (model) with a deployment system.
Denzel was created to fill this necessity, to create a framework where a data scientist could deploy a model, in a fast and reliable way.
Need to deploy? Denzel got your back.
Architecture and Task Flow
Under the hood denzel uses four docker containers and the system overview is as follows:
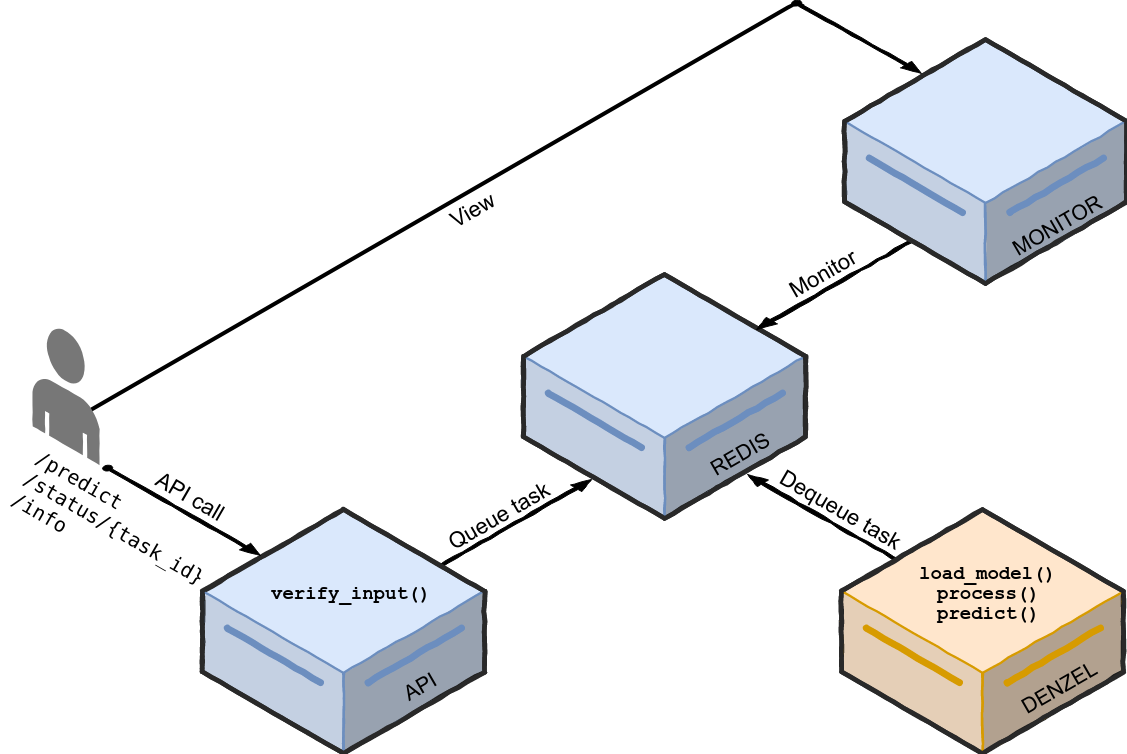
High level overview of the denzel architecture. Each box is a container (API, Redis, denzel and Monitor). In orange is the main container, where the model will reside. On top of each container we can see the functions that will need to be implemented by the data scientist
Each box, is a docker container with its own purpose.
On system startup (
denzel start) a worker inside the denzel container will use the pipeline.load_model() function to load the model into memory, and will keep it there until the worker shuts down (should happen only when the system is shut down).The worker, is always listening for tasks in the queue, which is inside the Redis container.
When an end-user sends a POST request to the
/predict endpoint, the request will first go through the pipeline.verify_input() function to make sure the schema is as expected by denzel (defined by the data scientist).If all is well, the request is turned into a task and is sent into the task queue and a response will be sent back to the user with a task ID.
As the task enters the queue, if the worker is not already busy it will consume the task. The task then goes through the
pipeline.process() function, which accepts the output of the pipeline.verify_input() function and parses it to model-ready data.If processing is successful, the model-ready data enters the
pipeline.predict() function where all the model magic happens and then a response with the prediction will be sent to a callback_uri which was supplied by the end-user initially.At any time during the lifetime of a task, the end-user can view its status through the /status/{task_id} endpoint, or through the built-in UI exposed by the Monitor container.
Note
By default, denzel will run tasks on parallel, one task per core - for example if the host has 8 cores, that means 8 tasks can be executed in parallel.
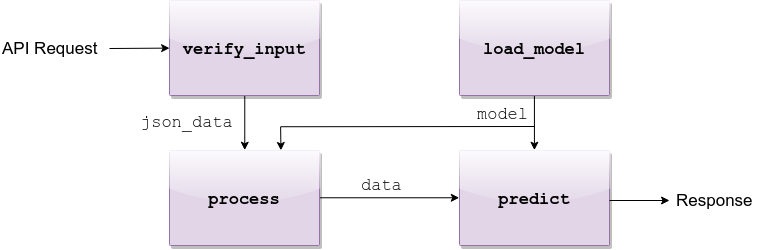
API request flow through the four methods
Tasks and Synchrony
Denzel separates tasks from predictions jobs. This is so denzel can support batching, where in one task multiple prediction jobs will be sent.
Consider the following request-body (as JSON) sent by an end-user:
{
    "callback_uri": "http://alonzo.trainingday.com/stash",
    "data": {"predict_id_1": {"feature1": 0.45, "feature2": -1.99},
             "predict_id_2": {"feature1": 0.09, "feature2": -6.15}}
}
As a response, the end-user will be returned:
{
    "task_id": "1ba0dccre8d67dsa",
    "status": "SUCCESS"
}
Note
The "status": "SUCCESS" means the task has been accepted - not that there was a prediction made yet.
Essentially it means the request has passed the pipeline.verify_input() method and has made it into the queue
Here we have a task submitted by the user with two separate prediction jobs.
If all goes well, as the end-user sends the request it will synchronously get a response with a task ID, uniquely identifying the task submitted.
After the data has been processed and the prediction has been made, an asynchronous response will be sent back to the
callback_uri and will look something like this:{
"predict_id_1": "hotdog",
"predict_id_2": "not_hotdog"
}
Why Async Responses?
The use of asynchronous responses is very common in API services.
Denzel, does not want to limit the data scientist and understands that processing and prediction (espcially of batches) might take longer than the end-user response waiting timeout.
Using asynchronous responses, the system virtually unlimited in time it takes to return a response, even though it’s recommended to respond as fast as possible.